
Welcome to this series of posts about microservices applications using NodeJS, NestJS Kafka, Kubernetes, and Amazon Elastic Kubernetes Service (EKS).
In this series, we are going to cover a microservices setup composed of two applications, an API and a worker.
In this post, we are going to create a REST API composed of basic CRUD operations that will produce Kafka events as the outcome.
Nest (NestJS) is a framework for building efficient, scalable Node.js server-side applications. It uses progressive JavaScript, is built with and fully supports TypeScript (yet still enables developers to code in pure JavaScript) and combines elements of OOP (Object Oriented Programming), FP (Functional Programming), and FRP (Functional Reactive Programming).
Why NestJS, Kafka and Kubernetes?
Microservices are small, modular applications that can be easily created, tested, and deployed. They are the perfect solution for organizations that want to break their applications into smaller parts so that they can be scaled more effectively. NestJS is a Node.js framework that makes it easy to create microservices applications. Kafka is a messaging platform that enables programs to stream messages to one or many consumers. Kubernetes is a platform for managing containers. These three tools combined creates one of the best stacks to achieve high scalability and performance.
Project Structure

The end goal is to have a monorepo with three projects, the api, the microservices, and a common library.
The api project’s responsibility is to handle the synchronous side of the architecture. It will have REST endpoints available to perform CRUD operations and as an outcome of those operations, events are going to be fired to a Kafka topic.
The microservices project will be responsible for the handling of the asynchronous requests, and we are going to configure a Kafka consumer using the @nestjs/microservices library.
Lastly, we are going to create a common project to hold code that should be shared across both projects.
After the project is complete, we are going to setup our applications in the cloud using Kubernetes and Amazon EKS.
Project setup
To create and execute the project you need to have docker, nodeJs (I recommend NVM for mac OS users), and git currently installed in your machine.
Let’s start by creating the api project:
Open http://localhost:3000/ on your browser and you should see the default NestJS Hello World message.
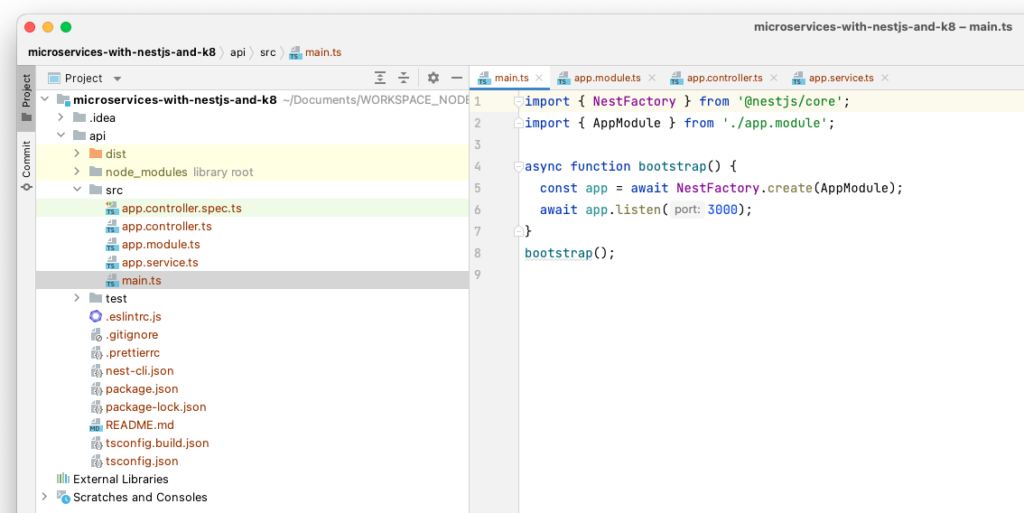
Open the project in your favorite IDE and look at the gen erated files. Please have a look at the main.ts, app.module.ts, and app.controller.ts files.
/services Endpoint
At this point, the application is up and running and we are going to create our new resource called services. Imagine services being offered and as a few examples, we can imagine web development, cloud migration, performance testing, hosting, and frontend development.
nest generate resource
# Type services
# Select REST API
# Select default YES
The output should be similar to the following picture:
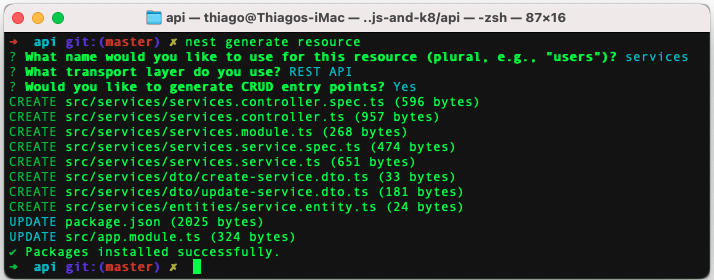
Using the command-line interface (CLI), NestJS generated the services resource containing the module, DTOs, controller, and service files. Please have a look at the controller and service classes.
It’s time to edit create-service.dto.ts to add the fields related to our services entity:
The update-service.dto.ts extends the CreateServiceDto class using nestJS provided PartialType and also adds an id field to identify the resource being modified:
For the changes to reflect automatically, it is necessary to restart the web server in development mode, to do so please run the following command:
# Press CTRL+C to stop previous execution
npm run start:dev
Let’s test at least the GET and the POST /services endpoints. I have used Postman for this job.
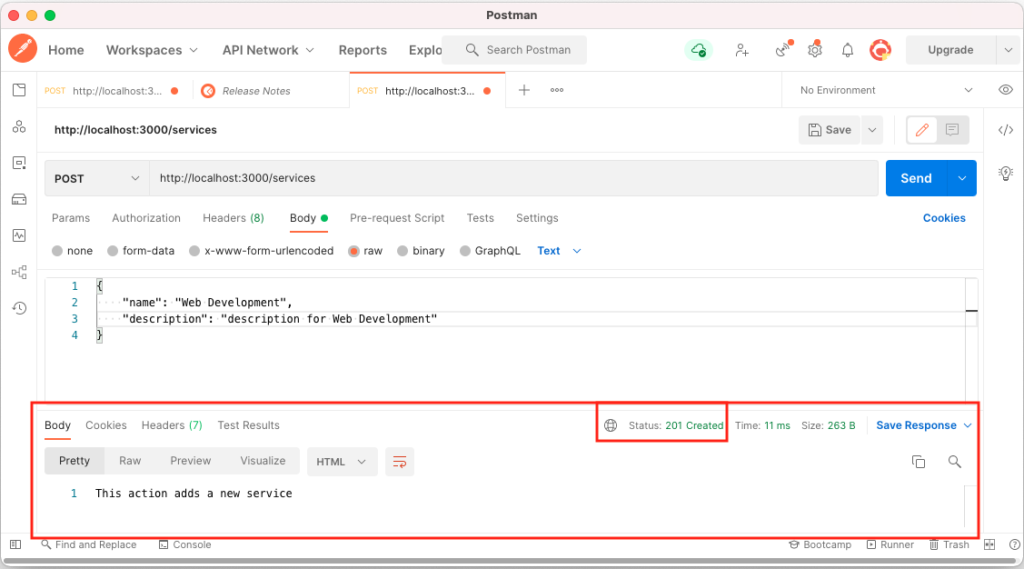
At this point, we have generated an api endpoint containing all four CRUD operations.
For the rest of the tutorial, we are going to setup Kafka for local development, and also configure our application to use ClientKafka to send messages (events).
Kafka Development Setup
To setup the Kafka cluster, please follow the Docker Compose Kafka Setup (Confluent Cloud) tutorial. Once Kafka is running and accessible at http://localhost:9021, we are going to setup the Kafka Client on the api application.
API – Request Flow & KafkaClient Configuration
The api request flow should work as follow:

The /services API is going to receive a POST request to create a new service, then it will call the service layer passing the received payload, and lastly, the service layer is going to send a message to a Kafka topic using a ClientKafka Producer.
To configure Kafka, it is necessary to import the client and define a provider to create the Producer. The client and providers configurations are done at the module level. Open services.module.ts to configure the CLIENT_KAFKA and the KAFKA_PRODUCER provider as follow:
Please pay attention to the brokers' property, make sure host.docker.internal is set at /etc/hosts file pointing to 127.0.0.1.
There are two important parts in the above module configuration, the KafkaClient and the Kafka Producer provider. On the top section, the KafkaClient is configured using the ClientsModule.register method and at the bottom, a provider is specified to generate a Kafka producer using the injected KafkaClient registered above.
After the module configuration is done, it is necessary to inject the KafkaProducer into the service layer. The producer is used to send events to a Kafka topic.
services.service.ts
After the code changes are done, it is time to validate the setup. The confluent control-center web app provides us a nice UI to look for events in real-time.
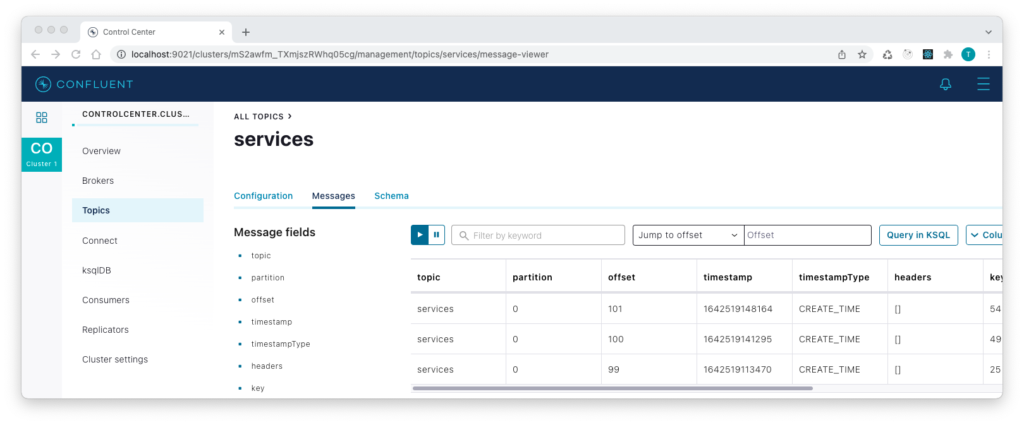
Make sure to restart the web server again so that it connects to Kafka, open the control-center (http://localhost:9021/) in your browser. Select the cluster and go to topic -> services -> messages.
With the messages tab open, it is time to send a POST request to the api server. You can do that using the following command or your favorite client.
You should be able to see the new message in the control-center, and that validates your setup is good.
NodeJS Microservices with NestJS, Kafka, and Kubernetes – Other Series Posts
- NestJS Kafka and Kubernetes – Part 1
- NodeJS Microservices with NestJS, Kafka, and Kubernetes – Part 2
- NestJS Shared Module Example – Monorepo Setup – Part 3
Conclusion
In the first part of this series, we have learned how to create a NestJS project capable of handling REST requests for CRUD operations, as well as connecting to Kafka and sending events to a topic.
In the second part of this series, we are going to explore the microservices part of this project. The microservices project will be responsible for consuming the Kafka events sent by the api project.
If you liked this post, comment and share it with your friends.
All the best,
Thiago Lima
6 replies on “NestJS Kafka and Kubernetes”
[…] is the second post in the “NodeJS Microservices with NestJS, Kafka, and Kubernetes” series, and we’ll build up the second application called microservices. The microservices […]
[…] NestJS Kafka and Kubernetes – Part 1 […]
[…] NestJS Kafka and Kubernetes – Part 1 […]
Hi Thiago,
Could you push a new article for setup applications in the cloud using Kubernetes and Amazon EKS, thank you so much.
I confess that would be the next topic. I still need to do it. Thanks for the suggestion and sorry for the delay to answer.
Very informative post. Looking more to something similar to this.