This article is the third article of the series “NodeJS Microservices with NestJS, Kafka and Kubernetes,” and it will explore the concepts of code reusability and code versioning while creating a NestJS Shared Module.
To follow the coding part it is necessary to clone the https://github.com/thiagotigaz/microservices-nestjs-k8 repository containing the code produced in the first two posts of the series.
In software development, there are two main development techniques that, when used together, can help teams achieve faster development. These are Shared Modules and Monorepo.
In this article, you will learn what is and how to build a shared module using NodeJS and NestJS. Additionally, it is also going to explain the two most common repository versioning strategies, Monorepo and Multi Repo. Finally, it will guide you to create a NestJS Shared Module in a Monorepo setup.
Note: If you are not interested in the conceptual part, feel free to skip to the conding part at the bottom.
What is a NestJS Shared Module and a Monorepo?
Sharing modules is a way to reduce repetitive work and ensure consistent quality across multiple projects. This can be done within the same organization or between different organizations. Shared modules are especially useful for projects that have common dependencies.
Monorepo is a development strategy where all code is stored in one repository. This allows for easy collaboration between small teams and makes the integration of dependencies much easier.
The benefits of using shared libraries
Shared libraries can help reduce development time by increasing code reuse. This not only reduces the amount of work that needs to be done but also ensures that all projects are using the same code base, which can help reduce code duplication and increase maintainability.
Shared libraries can help teams work better together. For example, many big companies have libraries that are used by different projects on different teams. In this case, the users of the library might need to request the creation or customization of new components. This process involves communication and cooperation between the team responsible for the library and the team requesting the new component.
Finally, shared modules can make the integration of dependencies much easier. Versioning and publishing a shared module helps to maintain compatibility, as one project can still use one specific version, while another one is using a newer version with upgraded code.
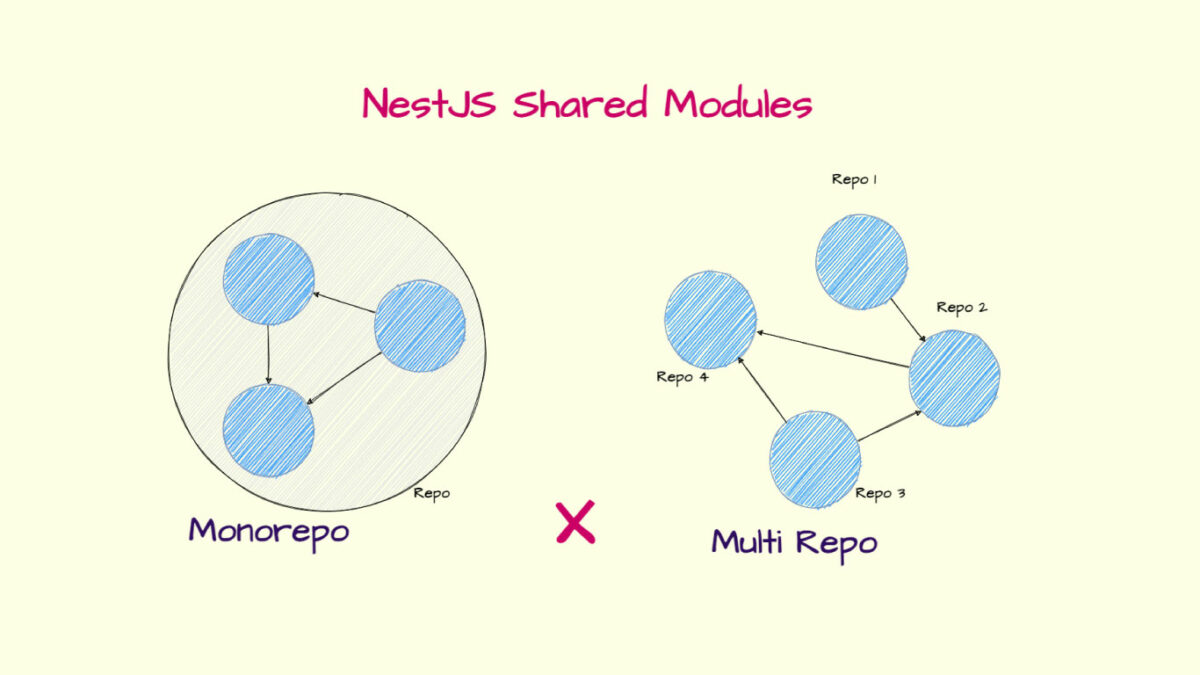
Monorepo vs Multi Repo
Monorepo vs Multi Repo is a debate that has been going on for a while now. On one side, some advocate for Monorepo, while others argue in favor of Multi Repo. So, which is the better option?
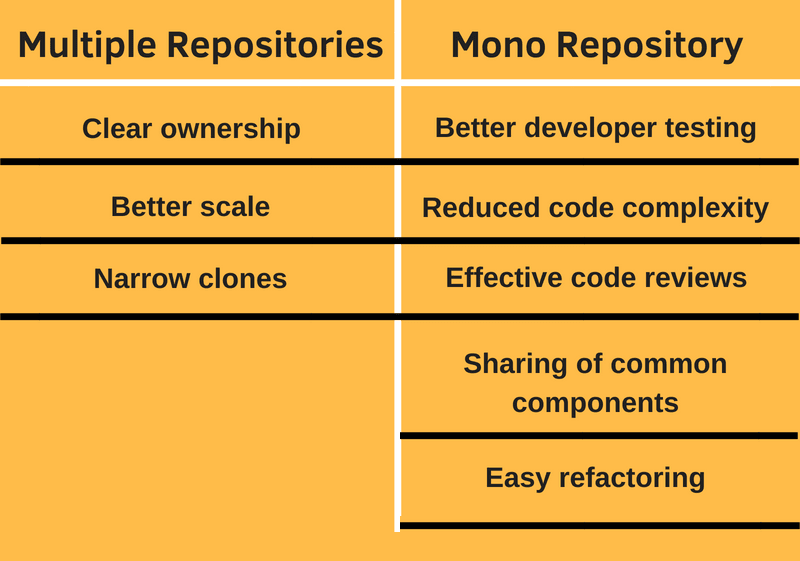
The case for Monorepo
Proponents of Monorepo argue that it is the best way to manage code. By having all code in one repository, it becomes much easier for small teams to collaborate and work on different parts of the project at the same time. This can lead to faster development times and improved communication within the team
Monorepo also makes the integration of dependencies much easier. When all code is stored in one place, it is very easy to manage to install the libraries on sibling projects using its relative path.
Finally, it is better to visualize what is going on in the project when using a Monorepo. When code is a single place, it is much easier to review and keep track of changes being introduced by teammates. (it is easier to have a glimpse of all open pull requests.)
The case for Multi Repo
There are several cases made against Monorepo, though the biggest one is the cost of maintenance. The argument states that manageability comes at the cost of an increase in repository size, which can lead to performance problems for continuous integration and deployment.
Even if performance isn’t an issue, there are still some who feel that Monorepo is simply too complex for their team to handle effectively. This can be exacerbated by large teams with many people working on different parts of the project.
There is also a case made for having code split across multiple repositories, arguing that it leads to better isolation and fewer dependency issues.
The debate over Multi Repo and Monorepo isn’t going to end anytime soon.
In conclusion, both Monorepo and Multi Repo strategies can greatly increase code reusability and collaboration within an organization. However, some considerations need to be addressed before choosing a strategy. In the end, choosing the right strategy comes down to the unique needs of each project and organization.
When is it best to use a Monorepo strategy?
There are several cases when using a Monorepo can be beneficial. These include:
- When starting a new project. Unless the project goal is to be a consumable library, start simple and prefer to use a monorepo.
- When the shared module does not have a proper release cycle including code reviews, version upgrade and release notes.
- If you find yourself frequently bumping up, and publishing a new version without any process, it is usually a red flag and an indication that this library would better reside alongside it’s consumers.
- When working on small teams.
When is it best to use a Multi Repo strategy
There are several cases when using a Multi Repo strategy can be beneficial. These include:
- When there is a need for better code isolation. In this case, having different code repositories can help reduce dependency issues and conflicts between teams.
- When there is a need to manage large codebases. In this case, splitting code repositories into different parts can help make it easier to manage and navigate.
- When there is a need for better performance. Splitting code repositories into different parts and publishing then individually, can help improve build and deployment speed.
- When library is going to be consumed by 3rd parties.
- When there is a need for versioning, and for maintaining backward compatility.
How can you decide which development strategy is right for your team?
Some factors you may want to consider include:
1. The size of your team. If the team is too big, and at least 3 people are working on each of the shared modules, it might be better to use a multi repo strategy. Otherwise, stick to monorepo.
2. The different languages your team is working on. Do not place libraries built with different languages in the same repository.
3. The consumers of the shared libraries. Do not place libraries that are consumed by third parties alongside internal libraries.
4. The type of codebase your team is working on. Is the shared module business-related, or an abstraction layer for a service, for example, a Redis cache.
How to set up a NestJS Shared Module on a Monorepo
Before going to the implementation details, make sure you have cloned the repository (tag name part 2) containing the code of the api and microservices projects produced previously.
Clonning repository
git clone -b part2 https://github.com/thiagotigaz/microservices-nestjs-k8.gitOnce the repository is checked out, and before the creation of the shared library, it is necessary to convert the repository to a NestJS Monorepo.
Converting NestJS standalone applications to Monorepo
To do so, start from the root of the repository and run the following commands:
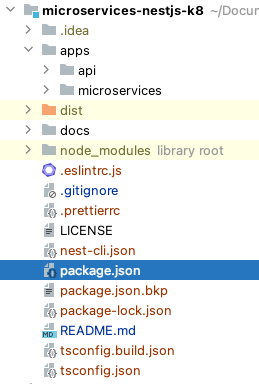
After the commands are executed, your project structure should look like the following picture:
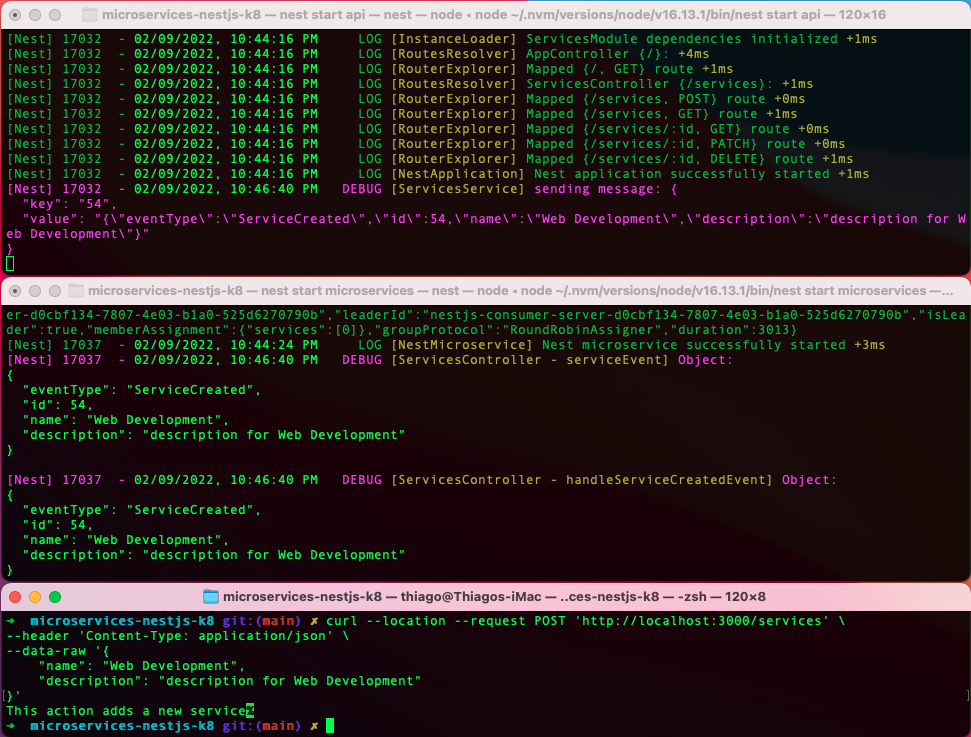
It is time to validate if the conversion worked. To do so, make sure kafka is running and start the projects using the following commands:
nest start api
# On a second terminal window
nest start microservices
# On a third terminal window
curl --location --request POST 'http://localhost:3000/services' \
--header 'Content-Type: application/json' \
--data-raw '{
    "name": "Web Development",
    "description": "description for Web Development"
}'
At this point, the conversion is done and the applications should be up and running. It is now time to create the shared module.
Creating a shared module
The shared module going to be created will be called common-dto. The common-dto is going to hold all the Data Transfer Object (DTO) classes that exists inside the api and microservices projects.
To create the library run the following commands in the root of the repository:
nest g library common-dto
# Type your company name to be used as preffix, in my case I've used @limascloud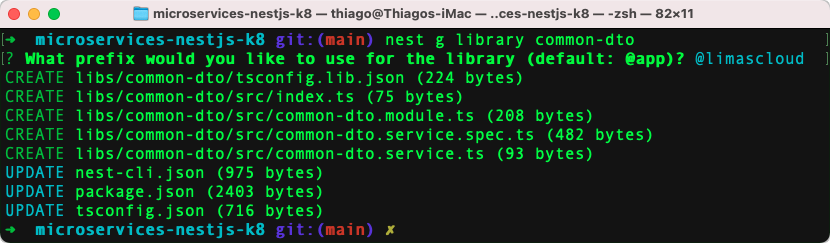
After creating the shared module, it is time to move the existing dto files from the api and microservices projects into the common-dto project.
You can move the files using your favorite IDE or with the following commands:
After copying the DTO files to the library, we deleted the original files from both the api and the microservices project. The next step is to modify the references on both projects to point to @limascloud/common-dto.
libs/common-dto/src/index.ts
libs/common-dto/src/services/dto/index.ts
apps/api/src/services/services.controller.ts
apps/api/src/services/services.service.ts
apps/microservices/src/services/services.controller.ts
After swapping to references, start the application again and restart your application using the curl command:
# terminal 1
nest start api
# terminal 2
nest start microservices
# terminal 3
curl --location --request POST 'http://localhost:3000/services' \
--header 'Content-Type: application/json' \
--data-raw '{
    "name": "Web Development",
    "description": "description for Web Development"
}'
After executing the commands, everything should work exactly the before and the output should be the same, exactly as demonstrated in the picture above.
NodeJS Microservices with NestJS, Kafka, and Kubernetes – Other Series Posts
- NestJS Kafka and Kubernetes – Part 1
- NodeJS Microservices with NestJS, Kafka, and Kubernetes – Part 2
- NestJS Shared Module Example – Monorepo Setup – Part 3
Conclusion
The debate between Monorepo and Multi Repo is one that is not going to end anytime soon. In order to decide which strategy is right for your team, you need to consider the unique needs of your organization. Some factors you may want to consider include, the size of your team, the different languages your team is working with, and who are the consumers of the shared modules. As a rule of thumb, I recommend starting with a simple Monorepo, and adapting to a multi-repo whenever there is a clear need for segregation.
Thank you for reading! I hope that this article has helped you decide which Monorepo or Multi Repo strategy is right for your team. If you have any questions, please feel free to leave a comment below. Happy coding 🙂
All the best,
Thiago Lima
3 replies on “NestJS Shared Module Example – Monorepo Setup”
[…] NestJS Shared Module Example – Monorepo Setup – Part 3 […]
[…] NestJS Shared Module Example – Monorepo Setup – Part 3 […]
[…] NestJS Shared Module Example – Monorepo Setup – Part 3 […]