Docker is a containerization platform that has made developing, deploying, and running software much easier. Docker containers are completely isolated from each other, just like traditional VMs, yet they use far fewer resources because they don’t have to run an entire guest OS in order to run their app. Docker enables you to separate your applications from your infrastructure so you can deliver software quickly.
Along with Docker come several best practices for usage in production environments. Following these docker best practices will help you avoid some of the common pitfalls that can be all too easy to fall into when using it in development, which can cause performance issues in production.
Following are the top 5 docker best practices to increase security, optimize image size and take advantage of some of the useful docker features to create leaner and more maintainable Docker files.
Use Official Docker Images as Base Image
Let’s say we are going to create a docker container for a node application. Instead of using a sample operating system image like Ubuntu, use the official node image. This will make your Dockerfile cleaner and will make sure you are using an image that was already built with a set of best practices in place.
Use Specific Docker Image Versions
The last thing you want to happen is to find out your deployment to production failed because of an upgrade on a base image. This is real and I already saw it happening in one of my previous jobs. Fortunately, this is easily fixable by setting a specific version.
The latest version is unpredictable and during a new build, you might get a different image version than the one you previously fetched, thus breaking or causing unexpected behavior in your application. The most specific version, you set, the better it is and it is also recommended to choose lts versions whenever available.
Never use:
FROM node:latestInstead use:
FROM node:lts-alpine3.12Favor Small Size Official Images
Whenever possible favor using small-sized official images instead of a full-blown operating system image (Ubuntu, Centos, Debian) which is fully loaded with tools that will never be used. Choosing a small, security-focused and leaner image like alpine is better to reduce the target image size.

We can see that for nodeJS we have multiple official underlaying images (alpine, alpine-slim, bullseye, buster) and the question is “Which one to use?” using larger images with lots of tools widens the attack surface because such images might contains hundreds of know security issues. On the other end, by using a leaner base image that only bundles the necessary operating system tools, you not only reduce the size, the repository space and the transfer speed, but also decrease the attack surface.
In resume, if your application does not need any tool from a full blown OS image, make sure to select the smallest and leanest image.
Optimize Caching Image Layers
Every docker image is made up of layers and during the build of the image, those layers are cached. When we select our base image it already comes with a set of layers that are cached and we just keep adding new layers on top of it.
The caching is important when we are pulling and pushing to the repository. If we pull an image that was already downloaded before and it now has two new layers, it means that we are going to download only the last two layers from the cache.
The order in which layers are specified is very important while building the cache. For example, let’s see the following unoptimized Dockerfile:
FROM node:lts-alpine3.12
WORKDIR /app
COPY myapp /app
RUN npm install --production
CMD ["node", "src/index.js"]
In the example above, the COPY command (layer three) is executed before npm install (layer four), this means that whenever we do a file change on myapp every layer starting from COPY will be executed again, thus delaying the build of the image because of the costly npm install.
Luckily, this can be easily fixed by changing the order of the layers like demonstrated in the picture below:
FROM node:lts-alpine3.12
WORKDIR /app
COPY package.json package-lock.json .
RUN npm install --production
COPY myapp /app
CMD ["node", "src/index.js"]
We made sure to first copy only package.json and package-lock.json and then run npm install. Whenever a dependency change exists it will start rebuilding the image from the first COPY command (layer three). If only applications changes took place, docker will reuse all cached layers before the second COPY command (layer five).
Define Multi-Stage Builds
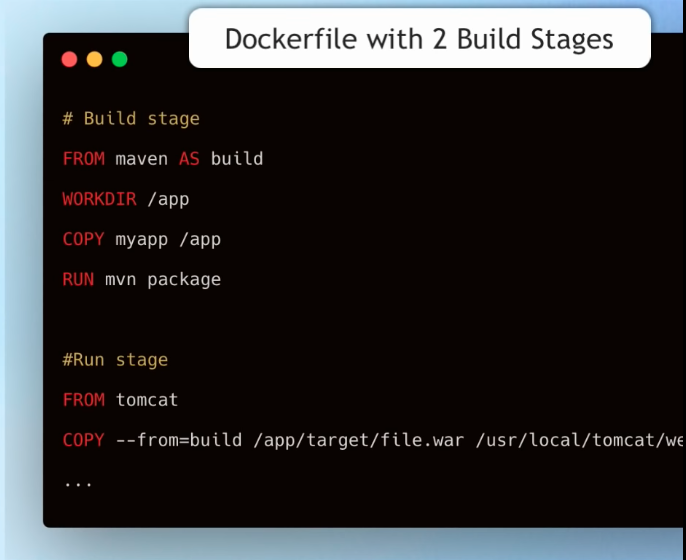
Whenever you have a lot of tools which are only needed for building your app, but not at runtime it is a good idea to define your Dockerfile using Multi-Stage Build. First we declare a build image to compile the app and then a second image for runtime. A good example would be a java application. It requires gradle and a Java Development Kit (JDK) during the build, but only a Java Runtime Environment (JRE) during runtime.
Conclusion
By following these simple tips, you can save time, bandwidth and disk space on your build server. Additionally, using a small-sized official image will help keep your image lean and optimized.
This post provided a walkthrough about the top 5 docker best practices to ensure you can build docker images that are faster, smaller in size, and with a smaller security exposure footprint.
Have you tried using any of the tips for your builds? Let us know in the comments below!
If you liked it, leave a comment and share with your friends.
All the Best,
Thiago Lima